So, it has been a long while since I have written on my blog. I just checked it and I have officially reached over 1000 views!! Thanks guys!! Don't know if that is good or not but it's good to me since I have only had this thing a few months.
I have been going through a lot of things personally lately, making it more and more difficult not to sit down and type out a few things. I am going to eventually get my post on my table done, as soon as it's done.... Yeah, not done. But it's close. So I figure, I need to just get out what I am working on right now, something totally different... wait for it..... wait for it...... a BUDGET!!! The word frightens me so! I am the WORLDS WORST when it comes to money. Thank goodness I have kept my head on straight not to bury myself into credit card debt or student loans. I have just a little debt that I am paying on to a hospital from something awhile ago, but anywho... Without divulging too much of my financial info, basically I am paying rent, gas, cable, power, groceries, insurance, hospital bill, and water. They are greatest to least in that order. That's right, no car payment yet! Woo hooo! I am lucky to make enough to cover those expenses and then some, but for some reason, I cannot save money. Which is what I plan to work on the next couple months.
I am taking the month of September as my guinea pig month. I am going to write down everything I spend. Yes, everything. I have no idea where all my extra money is going besides maybe going out to eat. I hardly ever get to buy new clothes, and with fall coming up, I really want to save money to buy some new work clothes. Don't forget Christmas is coming too and football season!!! I am hoping to surprise my boyfriend with UGA tickets this year. There is just so much going on that I want to have the money for so I have to start working right away.
By writing down everything I want to be able to create a diagram and categorize everything. I am stealing this idea from Discover because my Discover card has a way I can track how I am spending money and I can see that I need to stop eating out or buying clothes. So, in saying that, I want to see where this extra money is going and if I can see well that if I only have a certain amount of money to last me until payday, that candy bar might not be a good purchase, or might need to hold off on groceries for another week. I have got to learn how to stretch a dollar.
Currently, this evening, I have written down all of my monthly expenses that are concrete and never change and on another column wrote the ones that are variable. This is how it looks:
Fixed Expenses:
Rent
Electricity
Water
Cable
Variable Expenses:
Gas
Car Insurance
Groceries
Medical
Renters Insurance
I also split them up to the first of the month bills and the 15th of the month bills. I spend most of my paycheck at the beginning of the month since rent is my highest bill. So, with everything written out and I know what extra I should have after each paycheck, I should easily be able to put $200 in savings each month. With that said, starting September 15th I will begin a savings account and add that each month. That should bring me to $800 just before Christmas, which is way above what I would be spending anyway since no kids and my boyfriend and I don't spend a whole lot on each other. I get my Christmas bonus right after Thanksgiving so that will go straight to savings.
So, lets see if I can stick to the plan and save some money!!
I will keep you posted!
Go SAVE!
Kaitlin
Sunday, August 25, 2013
Monday, August 5, 2013
Drive thru Daiquiri, Bourbon Street, and Duck Waffles
So, a spur of the moment road trip to deliver a Polaris RZR turns into a mini vacation of a lifetime! New Orleans!! So, the boyfriend sold the RZR.... it was sad...
 This was it after a trip to Stoney Lonesome UTV park outside of Birmingham, AL back in Fall of 2012. Needless to say, we rode this this several more times before it was sold, and it was really sad to see it go. BUT we did turn a sad moment into a GREAT weekend in the Big Easy....
 I just want to share one of the most memorable experiences from New Orleans which was at on of Cory's good friends Bryon Peck's restaurant Elizabeth's. If you have been to New Orleans and not eaten here, you are seriously missing a piece of New Orleans.
We walked in and experienced VIP treatment (hey, it helps to know the chef) went upstairs to the bar area where we were asked if we were allergic to anything and if not, the kitchen would make something special. And special it was:
 Literally, hands down, the most amazing thing I have EVER eaten. And I eat good food. This "Waffle" which looks more like a southern biscuit is light, airy, slightly sweet and when smothered in a bananas foster creme and whipped cream it really tastes like a piece of heaven.. (My mouth is watering right now thinking about it). It is paired by what looks like a couple slices of bacon, but correction... Its Praline Bacon (pronounced PrAH-Lean not PrAY-lean like us Georgia folks are used to). Yeah, it's the best salty/sweet combo I have experienced so far in my 25 years of life, and they are known for it. So, the surprise from the kitchen didn't let me down so I took to the menu...
Feeling extremely brave, it must have been the drive thru Daiquiri Shop I had been sipping on for 4 hours, I ordered the craziest thing on the menu just to see if it would be any good. I mean he brought me the slice of heaven I just ate, why not be ballsy? So I found the Duck Waffle... Yes, DUCK! It is a cornbread waffle with a duck and sweet potato hash and pepper jelly... So this is what comes to me after I order:
 So, I was kind of nervous, I mean I really wanted to like this dish, but it was the wildest thing I had ever eaten in my life. It was a close second to what I ate earlier on the best things I had ever eaten. The waffle was crisp and not a super sweet cornbread mixture. The pepper jelly had a good temperature to offset the sweet potato hash. With the duck pieces, the texture was not sloppy but structured. Perfectly seasoned it needed nothing. Duck was tender too, which can be hard to do. So I look over at what my boyfriend decided to order and of course he doesn't stray far from a steak and eggs for his brunch:
 So sorry for the poor picture quality, when I get some extra money the IPhone is hitting the curb. This steak was ordered medium and was dropped in front of us medium. Like perfection. My biggest pet peeve at a restaurant is to order a steak MEDIUM and get a well done brick or something that looks like it was walked through a warm room. Perfect flavor, the hollandaise I could have eaten with a spoon, eggs over easy and the best potatoes ever. Again, perfectly seasoned and cooked. Cory actually let me have a bite (I believe so I would write a good review)!
The atmosphere was awesome, everyone was super cool and really friendly. I never caught the bartenders name, but he was great. You want to experience New Orleans? Head to Elizabeth's for brunch, like now.
 601 Gallier St. New Orleans, LA
Check out their website and like them on Facebook:
http://elizabethsrestaurantnola.com/index.html
https://www.facebook.com/pages/Elizabeths-Restaurant/154591867500
Thanks Bryon for an awesome experience and for breaking me into the New Orleans experience. We will be back soon!
Go EAT!
Kaitlin


We walked in and experienced VIP treatment (hey, it helps to know the chef) went upstairs to the bar area where we were asked if we were allergic to anything and if not, the kitchen would make something special. And special it was:

Feeling extremely brave, it must have been the drive thru Daiquiri Shop I had been sipping on for 4 hours, I ordered the craziest thing on the menu just to see if it would be any good. I mean he brought me the slice of heaven I just ate, why not be ballsy? So I found the Duck Waffle... Yes, DUCK! It is a cornbread waffle with a duck and sweet potato hash and pepper jelly... So this is what comes to me after I order:


The atmosphere was awesome, everyone was super cool and really friendly. I never caught the bartenders name, but he was great. You want to experience New Orleans? Head to Elizabeth's for brunch, like now.

Check out their website and like them on Facebook:
http://elizabethsrestaurantnola.com/index.html
https://www.facebook.com/pages/Elizabeths-Restaurant/154591867500
Thanks Bryon for an awesome experience and for breaking me into the New Orleans experience. We will be back soon!
Go EAT!
Kaitlin
Thursday, July 4, 2013
Making Something New... NEWER!
This is another one of my sister's projects. I believe my mother and sister are just doing the projects and I am stuck getting the typing done. But I do have some projects that have not been completed yet that I will post soon!!
My sister, who just completed repainting the chest of drawers on a previous post, decided she wanted a mirror above it. She went to Lowes and found a plain wood mirror on the clearance rack and decided to paint it. Here it is!
Materials:
Mirror in wooden frame
Painters tape
Newspaper or plastic for covering while painting.
Rust-Oleum Universal Spray Paint in Espresso Brown Gloss
Start with cleaning and wiping the mirror until it is clean and dry.


See how simple that was??
Go Paint!!!
Kaitlin
My sister, who just completed repainting the chest of drawers on a previous post, decided she wanted a mirror above it. She went to Lowes and found a plain wood mirror on the clearance rack and decided to paint it. Here it is!
Materials:
Mirror in wooden frame
Painters tape
Newspaper or plastic for covering while painting.
Rust-Oleum Universal Spray Paint in Espresso Brown Gloss
Start with cleaning and wiping the mirror until it is clean and dry.

Tape off the interior of the mirror and cover with plastic.

Use the spray paint and use even coats back and forth over the mirror frame to ensure no running of paint or missed spots.

Allow the paint to fully dry then hang where you want it to go!


Go Paint!!!
Kaitlin
Monday, June 24, 2013
Updating the Outdated
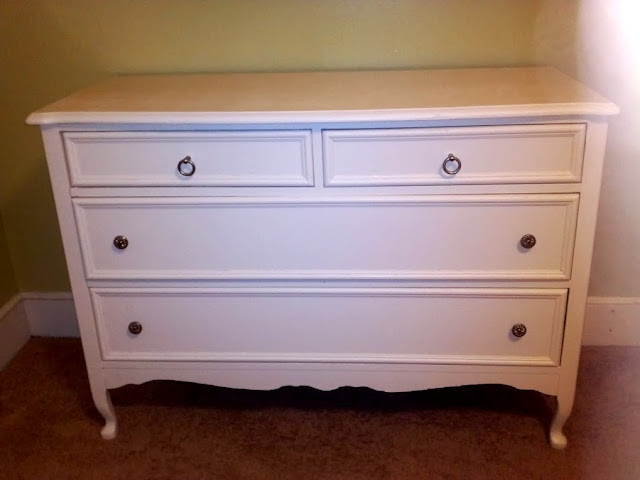
So, after I told my sister and my mama what I am doing with my blog now, their creative side has really shown up. My sister sent me a picture of an old chest of drawers and advised me that she was going to re-do it and she wanted me to put it on my blog. Well, turns out she is way better at tutorials than me, and a lot faster at projects than me. This project started with an old chest of drawers and turned into something you would find at the Pottery Barn. I absolutely love it! She even wrote the tutorial for me!... So here it is, my creative and talented sister's work:
All materials came from Home Depot:


All materials came from Home Depot:
Zinsser Cover Stain, Oil-based Primer (1 qt.)
Behr Premium Plus Ultra, Interior Satin Enamel, Ivory Palace (1 qt.)
Foam Roller (6")
Foam Brushes (for the details)
Wooden Trim (for drawer fronts)
Drawer Hardware

Directions:
1. After removing the old hardware, I thoroughly cleaned the inside and outside of the dresser with warm water and Greased Lightning (degreaser) as the dresser had been sitting in storage for a while.
2. I decided to attach the drawer trim before painting (don't know if it was easier or not) using a miter box/saw, measuring tape, and a nail gun. Tip: When attaching the trim to the drawer fronts, use a bit of wood glue in the corners, as that will eliminate any gaps in the mitered corners. I also used a corner sander to smooth down the rough edges and make for a better fit.


3. Now time to paint...I believe the "trick" to get that Pottery Barn finish is the foam roller/brush applicator and not necessarily the paint itself. First, I painted two coats of primer to the insides of the drawers and the top of the dresser as those areas were the most stained. Everything else got one coat. Tip: I used a completely different paint tray, foam roller, and brush to paint the outside of the dresser as I did not want the possibility of transferring dirt from the insides of the drawers to my outside finish.

4. Next, I painted two coats of the paint (it also has primer in it) to the outside of the dresser and one coat on the insides of the drawers. Tip: On the dresser top, I paid special attention to my roll marks to ensure a smooth finish. The less pressure placed on the roller, the better.

5. The hardest part of the project was waiting on everything to dry and cure fully before placing the hardware back on and moving it to its new home. I plan on using this method in the future with a nightstand and mirror.


Go DECORATE!!
Kaitlin
Special thanks to my sister Kindal for creating the masterpiece. I'm still waiting on my own......


Go DECORATE!!
Kaitlin
Special thanks to my sister Kindal for creating the masterpiece. I'm still waiting on my own......
Sunday, June 23, 2013
It's Canning Time!
I always love that time of year when someone you hold dear hands you two beautiful bags of fresh peppers. I was given banana peppers and green hot peppers from my boyfriend's mother who gave me the challenge of pickling the banana peppers and making pepper jelly. I will be posting my pepper jelly at a later date, but here is my rendition of canning banana peppers and it is pretty easy!
Materials:
11 Pint Jars with lids(Whatever size you would like is fine, I used regular mouth pint jars)
1 Gal Distilled White Vinegar
Jar Funnel
Ladel
Tongs
Large Pot
Knife
Cutting Board
Banana Peppers (I just had a grocery sack full, I didn't need to use all of them)
So, first thing is preparation which really is where the hard work is. It is EXTREMELY important that you do not skip the step of the sterilization process of these jars. If you have a dishwasher, wash them on the hottest setting with nothing else in the dishwasher with regular dishwasher detergent. If not wash them by hand in the hottest water you can stand. I just do not trust my dishwasher so I wash mine by hand. (Yes, I know they come straight from the package and are already clean, but they are not sterile.)
Wash away, get them nice and shiny clean!
.jpeg)

.jpeg)
.jpeg)
.jpeg)
.jpeg)

BEAUTIFUL! Label and put them away or give them away!
Any questions, please comment below!
Go CAN!!
Kaitlin
Materials:
11 Pint Jars with lids(Whatever size you would like is fine, I used regular mouth pint jars)
1 Gal Distilled White Vinegar
Jar Funnel
Ladel
Tongs
Large Pot
Knife
Cutting Board
Banana Peppers (I just had a grocery sack full, I didn't need to use all of them)
So, first thing is preparation which really is where the hard work is. It is EXTREMELY important that you do not skip the step of the sterilization process of these jars. If you have a dishwasher, wash them on the hottest setting with nothing else in the dishwasher with regular dishwasher detergent. If not wash them by hand in the hottest water you can stand. I just do not trust my dishwasher so I wash mine by hand. (Yes, I know they come straight from the package and are already clean, but they are not sterile.)
Wash away, get them nice and shiny clean!
.jpeg)
Next you need to get those peppers clean. I just rinsed these off in cool water really well and ran each one through my hands under the water. Then lay them out on a towel to dry.

Next thing to do is to get those peppers cut up! Just slice them however you will want them out of the jar. I slice them like they have them in Papa John's pizzas.
.jpeg)
Just cut the tops and bottoms off and slice. I leave the seeds for kick. Place the slices in a bowl and set aside. You will need to sanitize the jars next. Heat up a very large pot of boiling water. Be extremely careful, my mother and myself have burned ourselves many times while trying to do this, so if you want to spend the extra money to get a jar grabber, they are about $8 at Walmart and really safe. I didn't think I would need them so I just used my tongs.
Once the water is boiling, I dropped 3 cans at a time. Completely submerge them for 30 seconds under the boiling water then pick them up and set them on a towel to dry. Do the same with all the lids and seals.
While those are drying it's time to get the vinegar ready. I used distilled white vinegar and ended up using the whole gallon. The best way to do it is measure a little at a time and heat it up.
Heat up the vinegar on the stove, I used the same pot I sanitized the jars with.
.jpeg)
While the vinegar is coming to a boil flip those cans over and fill them to the brim with pepper slices.
.jpeg)
Once the vinegar is boiling and all the jars are filled, use the jar funnel and your ladle to ladle in the vinegar, filling to the very top of the jar, you really don't want any air. Place the seal then the lid on the can. I use a towel to hold the jars because they will be really hot and so I can have a good grip to twist the lids as tight as they will go.
.jpeg)
Once they are all filled and lidded, put them on the counter and DO NOT TOUCH THE LIDS!!! This will ensure they are sealed properly. And if you have canned before you know that sound of lids popping is the best sound in the world after all that work. If you hear all the cans pop, check them after awhile to make sure they all sealed good. All of mine did, but if yours didn't after about an hour, just repeat the process of canning and re-sanitize. Make sure the seal fits perfectly and doesn't have any blemishes. And wipe the seal off before placing on the can and they should look something like this!

Any questions, please comment below!
Go CAN!!
Kaitlin
Saturday, June 8, 2013
Real Roast Beef
So here is my first try at cooking something and putting the recipe on here. I will start by saying when it comes to measuring, if it's regular meal food, I do not measure. If it is baking, IT MUST BE MEASURED. Baking is a lot more complex than just a sprinkle of salt. So here goes this roast beef recipe.
The reviews of this recipe were great, I usually cook this type of meat in a crock pot that can be simmered on all day, but I was told I was not a real woman until I cooked a beef roast in the oven. Challenge accepted, and it did turn out pretty good. Not as tender as a crock pot, but who has time to leave that thing in the oven for hours, not this girl! I hope I explain it well enough and I hope I put in enough pictures. Trust me, this was not hard at all. Here goes:
I purchased a Chuck Roast, but any beef roast will do.
.JPG)
.jpeg)
.jpeg)
.jpeg)
.JPG)


The reviews of this recipe were great, I usually cook this type of meat in a crock pot that can be simmered on all day, but I was told I was not a real woman until I cooked a beef roast in the oven. Challenge accepted, and it did turn out pretty good. Not as tender as a crock pot, but who has time to leave that thing in the oven for hours, not this girl! I hope I explain it well enough and I hope I put in enough pictures. Trust me, this was not hard at all. Here goes:
I purchased a Chuck Roast, but any beef roast will do.
.JPG)
This one was about 2.34 lbs and fed 4 people very well. I started by heating up a skillet with about 3 tablespoons of EVOO and got the pan pretty hot. Don't get it too hot though if so use vegetable oil or regular olive oil. EVOO has a lower burn temperature so you can burn it pretty easy if you are not careful. I just had EVOO on hand so that's what I used.
.jpeg)
Let each side of the roast get a good brown, you are not cooking the roast, just getting a good stable place so the juices don't just run out when it is cooked. They stay inside the meat. Next I cut up onions and potatoes. These potatoes are general red potatoes that my daddy and nephew grew in the garden. I always try to use fresh vegetables, never canned. The only vegetable I use canned is corn, just because when we grow it, it doesn't last long. Anyway, use whatever potatoes you want, these were just available. Cut the potato in bite sized pieces and place in a 9x13 pan. Take your onion and just cut into strips. This is my favorite way to cut and eat an onion. It keeps its texture, but it doesn't overtake the dish.
.jpeg)
.jpeg)
Lay them in the pan along with the potatoes. I save a couple strips to place on top of the roast when it goes in the pan. So that brings us to putting the roast in the pan.
.JPG)
After the roast is in the pan I sprinkle everything with seasoning. I used "Beef Stew" because it is what I had on hand by McCormick in the pre-packaged seasoning. I also sprinkled with salt and pepper then smeared a teaspoon of minced garlic in oil on each side of the roast as seen above. This melds all the flavors together into almost a paste and it sticks to the roast. Use whatever seasoning you like, these are just a few of my favorites for this. Put 1-2 cups of water in the bottom of the pan. Next wrap in foil creating a dome to circulate the heat.

I baked this at 350 degrees for an hour, flipped the roast over, lowered the temp to 300 degrees, then baked another 1.5 hours. I let the meat sit in the oven for about 30 minutes with the oven off to rest a bit. (Rather I was working on another project and wanted it to wait on me a few minutes.) I took it out and this is what I got along with my house smelling a little like heaven...

I had great reviews, but I feel it was not the best roast I had ever had. I have this pre-determined criteria of what roast beef should be, which is falling to pieces, but that's not it at all. It can keep it's shape, and this roast did. It was tender and flavorful and the potatoes were AMAZING! There was nothing left but it fed us all well, we all had seconds.
Don't be scared to try this recipe, it seems like a lot, but I promise it is super easy. If you are going to be home cleaning all afternoon, or just be around the house and don't want a lot of fuss and muss over supper, but something filling. This is it. Comment below!
Go COOK!
Kaitlin
Wednesday, June 5, 2013
Door Wreath
So here is a project I did that was pretty simple. I am an advocate for Hobby Lobby. I love what they stand for and LOVE their prices, and if you don't have the Hobby Lobby app... Please, please, please do yourself a favor and download it now...http://www.hobbylobby.com/ this is where I got all the items I needed.

So here is my beautiful wreath! My mom picked out the colors, which I didn't think would look that good (and they are Tennessee colors... Yuck! Go DAWGS!) but this was super cute for summer. Here is what was used:
Materials:
-1 Med Size Grape Vine Wreath
-1 Roll wide Wired Burlap Ribbon (in any color you like, white is shown here)
-1 bundle daisies (Now use your creativity, you can use any flower you like, any color you like. I always say if it pops out at you and you like it, it's probably meant to go home with you, Orange Daisies did it for me)
-Gardening Wire
-Wire Cutters
Now, I learned how to make a bow from working in a bridal boutique where all the gifts had hand made bows, so I am not expecting you to get it on the first try. One day I will upload a video of me making my bow. If I can do it anyone can! It is too easy!! I will try to explain in my wording.
Take as much slack from the ribbon as you want to hang from the bow then make a "dog ear" twist it one good time. This is why you use wired ribbon, it actually stays! make another "dog ear" in the other direction and repeat until you get the results you want. I did approximately 10 times, 5 on each side. It will be flat in the middle, but once you put on the wreath you will fluff it, but we will get to that shortly. Cut a foot piece of gardening wire and wrap around the middle of the bow to secure it together then leave enough slack to tie to the wreath. Cut the two leftover pieces hanging so they are the same length. Position the bow where you want it on the wreath and fluff the "dog ears" until you get them looking good. I thought slightly to the side would be cute on the positioning. Use the extra wire to attach to the wreath and just twist it like a twist tie until it is secure. Next, use your wire cutters to cut the stems of the flowers to just short enough where they can stick in the wreath but not poke out. Just stick them in randomly and fill in a random area. Remember, this is all using your creativity, make it your own!! And that's it!! Super easy! Literally it took 10 minutes and I was done and I love it! The next thing I would have done would have been to add an initial or monogram, but since my roommate is a guy, I knew the orange flowers were enough...
So simple, so easy, so CUTE! I get so many compliments on it. Any questions please post I will try to answer!
Go CREATE!!
Over Achieving!
Hey guys!
So day two and I am already writing another post! I am such an over achiever! So I am diligently working on my next project, taking pictures, and getting prepared to put it on another post. I am working on my dining room table and it is a long process! Mainly because I just work on it little by little everyday since I do work a full time job. I do have to wait until the sun goes down here in Georgia (cue some Corey Smith: http://www.youtube.com/watch?v=tmrqec_vRNs ) since it is already closing in on 100 degrees! Hopefully this project will be completed soon.
I am hopefully going to start documenting more of my exciting trips as well. I do travel a lot since my boyfriend is 2 1/2 hours away and my family is 2 hours away in the other direction. This weekend I am headed to Destin, FL with my best friend, Jenna, for a much needed girls weekend! Will have to post pictures when I get back, or if I could finally figure out how to do it on my phone I would do it that way as well (should have gone with the droid). So any IPhone users out there that can give me a tutorial, please let me know!
Happy Hump Day everyone!!!
Tuesday, June 4, 2013
In the beginning...

I will be posting my projects and cooking skills. I am not going to lie, it's kind of weird posting my thoughts to a site that will share it with the world, but hey, if you are good at something, you better share the goods!
Maybe I will write longer blogs one day but after spending an hour trying to think of a name, I'm tired and ready to keep working on my refinishing/reupholstering project. Will post pics soon of before and after and how I did it. It's a long project, so should be a good blog. Please share my blog and comment frequently!!
Thanks everyone!!
Kaitlin
Subscribe to:
Posts (Atom)